

You can run WebCalendar inside a docker container. There are files in the WebCalendar git repo that use docker-compose to setup a dev environment using two containers:
- php:8-apache: Debian with PHP 8.0
- mariadb: MariaDb (open source mysql)
Note that this is meant to be a development environment and comes with some limitations. No cron setup means there is no way to send email reminders or reload remote calendars. It also is configured with a default database password. So, you should at minimum change the password in docker-compose.yml before building the containers. The GRANT command below also grants access to any remote host. In a properly secured configuration, you would like access to the MariaDb database to only the WebCalendar host.
Table of Contents
Step 1: Clone the Repo
If you have not done so already, clone the git repo:
git clone git@github.com:craigk5n/webcalendar.git
Step 2: Update the Database Passwords
Edit the docker/docker-compose-php8.yml file with your favorite text editor. Take note of the database password since you’ll need it below and during the WebCalendar web-based install.
Step 3: Build the Containers
After you have cloned the git repo, use the following command from within the toplevel WebCalendar source code to build your docker containers:
docker-compose -f docker/docker-compose-php8.yml build
This is a one-time command, and you should not need to build the containers again.
Step 4: Start the Containers
Use the following command to startup the MariaDb and WebCalendar containers:
docker-compose -f docker/docker-compose-php8.yml up
This will startup the containers in your terminal and print out the output of the two containers. You can stop the containers with CTRL-C. After the initial build, you can just use the second command to startup the containers. To startup the containers in the background, use:
docker-compose -f docker/docker-compose-php8.yml up -d
Step 5: Setting up the Database
Once everything is up and running, you will need to grant the required mariadb access so that the WebCalendar installer can access and setup the database. Start by starting up a mariadb command line client through docker-compose:
docker-compose exec db /bin/mariadb -p
The password is the one you (hopefully) updated in docker-compose.yml. Run the following db commands (and replace WebCalendar.1 with your updated password):
GRANT ALL PRIVILEGES ON *.* TO webcalendar@localhost IDENTIFIED BY 'Webcalendar.1' WITH GRANT OPTION;
FLUSH PRIVILEGES;
QUIT
Step 6: Run the Install Wizard
Go to the following URL to startup the web-based install wizard:
http://localhost:8080/
This will ask you to create a login password. You may need this again to update WebCalendar later. (There is no username, just a password). Select the “mysqli” database connector and provide the same database credentials you have in docker-compose.yml. Once you are done, your WebCalendar setup will be complete. Below is a screenshot of the proper settings for use with the default docker configuration.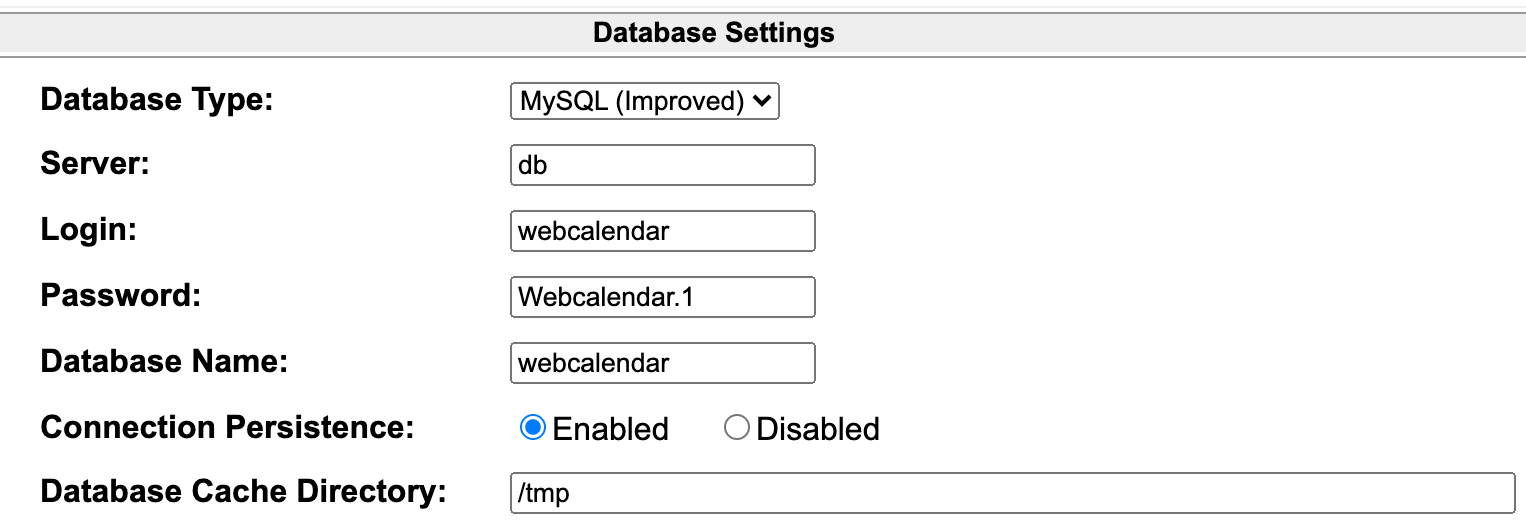

Other Useful Commands
- Shell into the PHP container:
docker-compose exec webcalendar /bin/sh - Start a MariaDb client (the password is in the
docker-compose.ymlfile):docker-compose exec db /bin/mariadb -p - View the log output from the WebCalendar container:
docker-compose logs web-calendar